Mastering Tie Knots: 7 Styles for Every Event

Ever needed to master the art of tie-knotting or just want to expand your repertoire? This detailed tutorial will perfectly complement your formal attire, especially for weddings.
At some point, everyone needs to know how to knot a tie. It might be a quick refresher on crafting a Windsor knot or your first time ditching the clip-on for a more sophisticated look. Learning to knot a tie is an essential skill, particularly with weddings on the horizon (and don't overlook mastering the bow tie too). Both guests and grooms often find themselves needing to don a tie for such grand events, and there are numerous methods to do so. From the timeless Windsor knots to more intricate and stylish variations, this guide covers all you need to know about knotting a wedding tie.
Quick Guide: The Simplest Tie Knot In a hurry?
There's a knot for that too. The simplest tie knot is the classic Windsor Knot, the first style that usually comes to mind at the mention of 'tie.' It's straightforward with just a few easy steps and pairs well with almost any suit.
Different Tie Knot Styles
There's a myriad of tie knots, each differing in style, formality, and complexity. The best choice often depends on the suit or shirt you'll pair it with. Let’s explore the options.
Tie Knot Varieties to Master:
- Full Windsor Knot
- Half Windsor Knot
- Four-in-Hand Knot
- Trinity Knot
- Pratt Knot
- Kelvin Knot
- Eldredge Knot
Creating a Full Windsor Knot
Ideal for job interviews and social gatherings, the Full Windsor knot has a polished, triangular shape. Best suited for spread-collar shirts due to its broad look, this knot is simpler to tie than it looks.
Difficulty: Easy
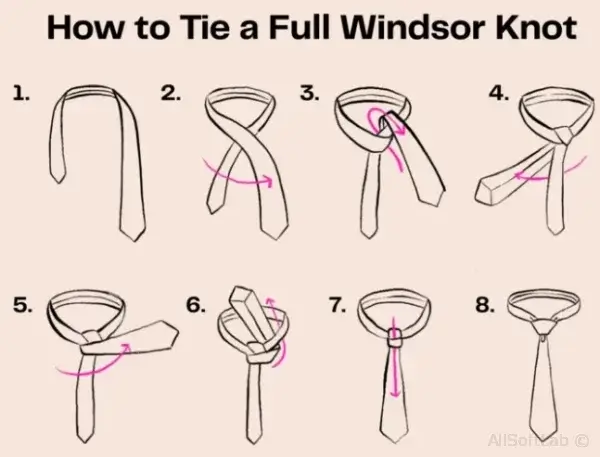
Steps for the Full Windsor
- Knot Start by lifting the shirt collar and placing the tie around your neck, ensuring the wide end is on the right and hangs about 12 inches longer than the narrow end.
- Cross the wide part over the narrow one.
- Pull the wide end upwards through the neck loop, then downwards.
- Loop the wide end under and to the right of the narrow end, wrong side out.
- Cross the wide end over to the left of the narrow part, right side out.
- Lift the wide end through the neck loop again.
- Thread it down through the front loop.
- With one hand, gently slide the knot up towards the collar, holding the tie ends with the other hand. Lower the collar to finish.
Knotting a Half Windsor Knot
The Half Windsor knot, with its symmetrical, triangular shape, offers a classic look. It’s smaller than a full Windsor, pairing well with wider, medium-weight ties and any dress shirt. This knot is straightforward to master.
Difficulty: Easy
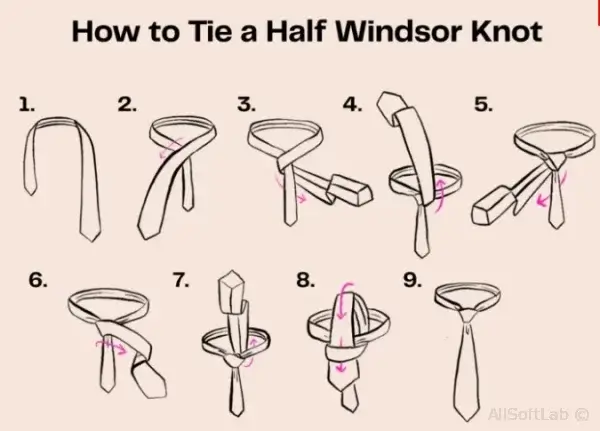
Steps for the Half Windsor Knot
Similar to the full Windsor, begin by lifting the shirt collar. Place the tie around your neck, with the wide end on the right and extending about 12 inches longer than the narrow end.
- Cross the wide end over the narrow one.
- Loop the wide end behind the narrow part, wrong side out.
- Move the wide end up and over to the left.
- Pull it through the neck loop, laying wrong side out to the right.
- Cross the wide end over the narrow part from right to left, right side up.
- Lift the wide end through the neck loop again.
- Thread it down through the loop at the collar front.
- Adjust by sliding the knot upward with one hand while holding the tie ends with the other. Finish by lowering the collar.
Tying a Four-in-Hand Knot
The four-in-hand knot is suitable for wide neckties made of heavy fabrics and enhances a traditional look when paired with a standard button-down dress shirt. This knot is easy and quick to tie.
Difficulty: Easy
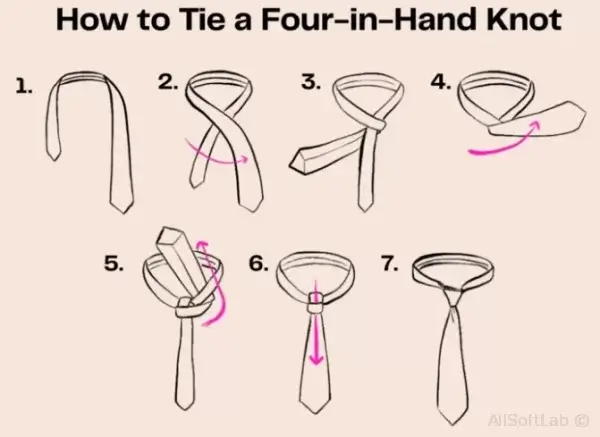
Steps for the Four-in-Hand Knot
- Raise the shirt collar and drape the tie around your neck with the wide end on the right, extending about 12 inches longer than the narrow end.
- Cross the wide part over the narrow part.
- Loop the wide part under the narrow one.
- Cross the wide part back over the top of the narrow part.
- Pull the wide part up through the large neck loop.
- With the knot loosely held, insert the wide end downwards through the front loop.
- While holding the narrow end of the tie, slide the knot upwards until neat. Lower the collar to complete.
Crafting a Trinity Knot
For those comfortable with basic tie-knotting, the Trinity knot offers a more sophisticated style, inspired by the Trinity symbol. More complex than the Windsor and four-in-hand knots, the Trinity knot is intricate but makes a bold statement at formal events.
Difficulty: Medium

Steps for the Trinity Knot
- Lift the shirt collar and place the tie around your neck, with the wide end hanging on the right side, near the navel.
- Just below the collar, pinch the wide side of the tie to form a dimple.
- Cross the thin part over the thick part.
- Bring the thin end up through the neck opening.
- Lower it back down to the right side.
- Cross it under the thick part to the other side, wrong side up.
- Lift the narrow end.
- Thread it through the neck loop, moving right to form a heart shape.
- Cross it over the heart shape and lift it through the neck loop.
- Thread it through the knot, keeping the top loop loose.
- Move it behind the thick part to the other side.
- Lift the now short end through the loose loop.
- Adjust for tightness and symmetry, tucking the end under the neckline. Fold down the collar for a complete look.
Tying a Pratt Knot
Known also as the Shelby knot, the Pratt knot brings a refined touch to any dress shirt. Being slimmer than the Windsor knot, it's perfect for lightweight to medium-weight ties. It's straightforward to tie the Pratt knot.
Difficulty: Easy
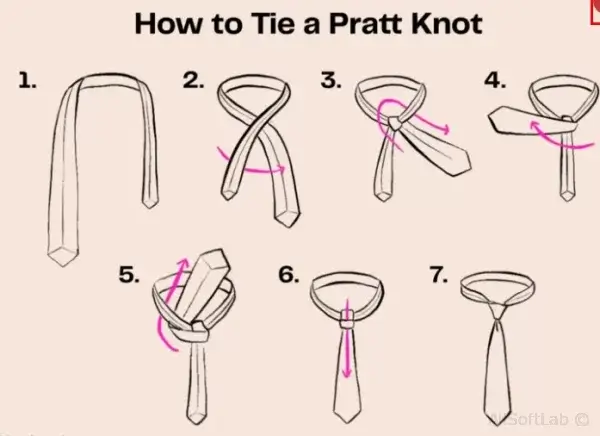
Pratt Knot Steps
- Start by lifting the shirt collar and placing the tie around your neck, wrong side up, with the wide end on the right and about 12 inches below the narrow end.
- Cross the wide part of the tie under the narrow one.
- Lift the wide end through the neck loop and tighten.
- Cross the wide end to the right, right side facing up.
- Pull it up through the neck opening.
- Thread it down through the knot loop.
- Gently adjust the knot and lower the shirt collar to finish.
Knotting a Kelvin Knot
The Kelvin knot is unique and easy to learn, giving an even and sophisticated appearance. Here's how to tie it in a few simple steps.
Difficulty: Moderate
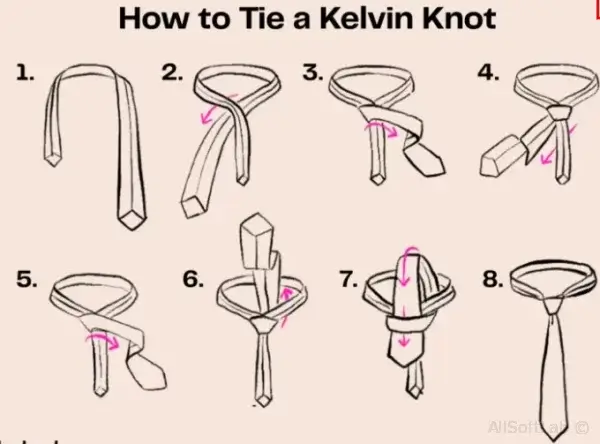
Kelvin Knot Steps
- Wrap your tie around your collar, seam out, with the thick end on your left. Let the end hang two or three inches lower than your desired finishing point.
- Cross the thick end under the thin side from left to right, forming an X under your chin.
- Take the thick end across the front knot from right to left. Wrap it around the thin end, passing back underneath the knot from left to right.
- Bring the thick end horizontally across the front from right to left. Place a finger under the horizontal band you've created.
- Loop the thick end under the collar loop.
- Bring your thick end through the horizontal loop. Tighten the knot into place.
- To tighten, hold the knot and pull on the narrow end.
Creating an Eldredge Knot
The Eldredge knot, known for its complex design, is a statement maker. It might take time to learn, but the steps are less daunting than they seem. Unlike other knots, the Eldredge is formed entirely from the narrow portion of the tie.
Difficulty: Hard
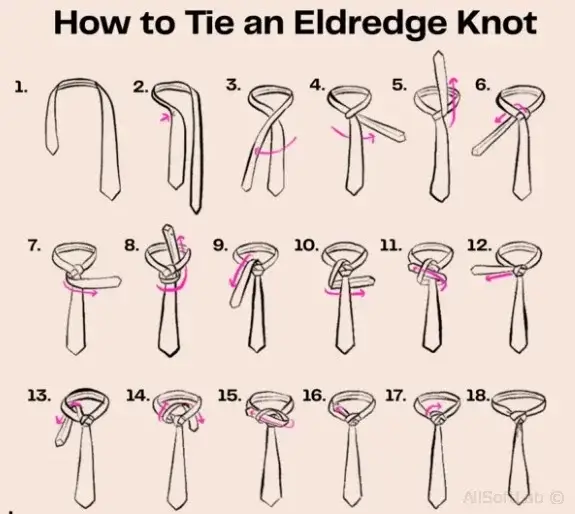
Eldredge Knot Steps
- Begin by raising the shirt collar and draping the tie so the wide end is on the right side, just below the navel.
- Pinch the thick side of the tie near the collar, creating a dimple.
- Cross the thin part over the thick part of the tie.
- Then, bring the thin part under the thick part, wrong side up.
- Lift the thin part toward the neck.
- Thread it down through the neck loop to the right, wrong side up.
- Circle it left, around the front of the knot.
- Lift it up through the neck loop.
- Bring it back down to the right.
- Cross it behind the wide part to the left, wrong side up.
- Cross it across the front to the right, threading through the previous loop.
- Tighten by pulling the narrow end to the right.
- Lift the end straight up and through the neck loop to the right of the knot.
- Bring it up, over the knot to the left.
- Keeping the knot loose, lift the short end to the right and through the loop just made.
- Pull to tighten.
- Tuck the end behind the neckline on the left and lower the shirt collar for a polished finish.
Frequently Asked Questions about Tie
Knotting Is a tie necessary for a wedding?
The need for a tie at a wedding depends on the dress code. For formal events like black-tie or semi-formal, a tie is usually required. In more relaxed settings like dressy casual, a tie may not be necessary. When unsure, it's safer to wear one as it can always be removed later.
Are some tie knots more formal?
Yes, the complexity of a knot often dictates its formality. For instance, an Eldredge knot suits black-tie events, while a Half Windsor is more casual, ideal for cocktail attire and semi-formal weddings.
Does your shirt affect tie choice?
Absolutely. The key is proportion. Thicker, wider knots match well with broader shirt collars, while smaller, thinner knots suit slimmer collars.
A tie, worn under the shirt collar and knotted at the throat, brings professionalism and elegance to a suit, vest, or shirt and slacks. It elevates the sophistication of any wedding guest attire. While clip-on ties offer convenience, hand-tied straight ties are more appealing. With six different knots to choose from, there's a style for every neck size and shirt type. If you're new to tie knotting, start with the full Windsor. Our instructional videos and simple guides make it easy for anyone to achieve a polished look. Practice in front of a mirror for the best results.
Смотрите также: